Adding mods to MS-20M
Add VCO2 CV IN (Hz/V) for MS-20M
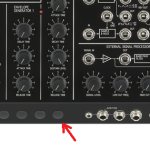
MS20M is latest version of MS family from Korg. I think that it should be the best model for the one who want to hack it. the body have some holes with plastic cap that can be removed. It makes us easy to add mod. All we love holes!
‘I want to get it, if I could.’ I said to my friend and he said that he already add mod just like this. And he sent me one of great mod plan so closely.He gave me a permission to publish it. So I did.
It’s adding Hz/V cv input to VCO2. All the MS-20 family have VCO2 CV in. But it’s omitted in MS-20M. So we get it back.
I don’t get MS-20M yet, so I can’t answer questions about this issue. but anyway this is great information for everyone who loves MS-20. enjoy it.
KorgのMS-20M Kitは、MS-20をベースにさらなる改造を加えて、組み立て式として再デビューしたMS-20の究極の進化形。
まるで改造してくださいと言わんばかりに筐体はすでに穴あけ済み。キャップを外せばすぐに追加のジャックがつけられるという、もう、マニアのために作られたとしか思えない筐体。
まだ手に入るかな、ちょっと欲しいかな、と、知り合いに話をしたら、こんな改造をしたよという丁寧なレポートをいただきました。
VCO2に Hz/V cv を追加する改造です。これまでの機種には付いていた VCO2 CV IN がなぜか、MS-20Mでは削除されています。これを復活させる改造になります。
本来なら僕が手に入れて追試したレポートをするべきなんですが、知り合いからの許可をいただいたので、先行して紹介します。
まるで改造してくださいと言わんばかりに筐体はすでに穴あけ済み。キャップを外せばすぐに追加のジャックがつけられるという、もう、マニアのために作られたとしか思えない筐体。
まだ手に入るかな、ちょっと欲しいかな、と、知り合いに話をしたら、こんな改造をしたよという丁寧なレポートをいただきました。
VCO2に Hz/V cv を追加する改造です。これまでの機種には付いていた VCO2 CV IN がなぜか、MS-20Mでは削除されています。これを復活させる改造になります。
本来なら僕が手に入れて追試したレポートをするべきなんですが、知り合いからの許可をいただいたので、先行して紹介します。
the body have holes already. Remove cap then you can put 6.3 std jacks there easy. In this mod, you may need to use the jack with switch.
All the pictures can be enlarged by click.
All the pictures can be enlarged by click.
筐体はすでに穴が開いているので、キャップを外せば6.3mmのジャックがすぐに取り付けられます。この改造では、スイッチ付きのジャックを使います。
すべての写真はクリックする事で拡大することが出来ます。
すべての写真はクリックする事で拡大することが出来ます。
This is schematics. Just adding jack there. Without plug, the signals from Yellow line flow to green line. if you plug there, yellow line going to be open, and green line may get the signal from plug. Black line get down to the ground.
回路はこんな感じ。ジャックの追加だけです。
プラグが入っていないときは。黄色からの信号を緑に流れるように配線します。プラグが入ると、黄色の信号はオープンになり、プラグからきた信号が緑の線に入るように配線します。黒がグランド。
プラグが入っていないときは。黄色からの信号を緑に流れるように配線します。プラグが入ると、黄色の信号はオープンになり、プラグからきた信号が緑の線に入るように配線します。黒がグランド。
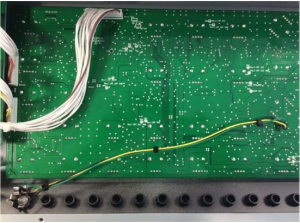
Wire them, just like this. It looks so far .
基板とジャックの配線はこんな感じ。結構長いですね。
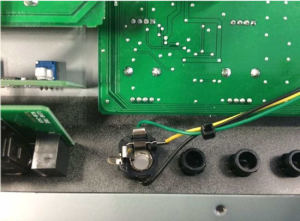
Enlarge around Jack.
ジャックの周りの拡大。
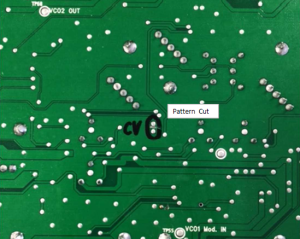
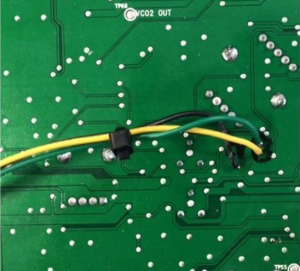
there needs pattern cut. check out more closely. you can get more high resolution picture by pdf.
問題の基板の方は、パターンカットが必要。PDF版の方をダウンロードして拡大して詳しくチェックください。
Wire each side that you cut and get the ground (black line) Around there.
カットした両端に緑と黄色の線を配線し、グランドの黒はその辺の良い所からとります。
”MS-20M Kit” and another products names are trademark of KORG INC.




 MS-20M_Kit_Reconstruction (More high resolution version in PDF)